

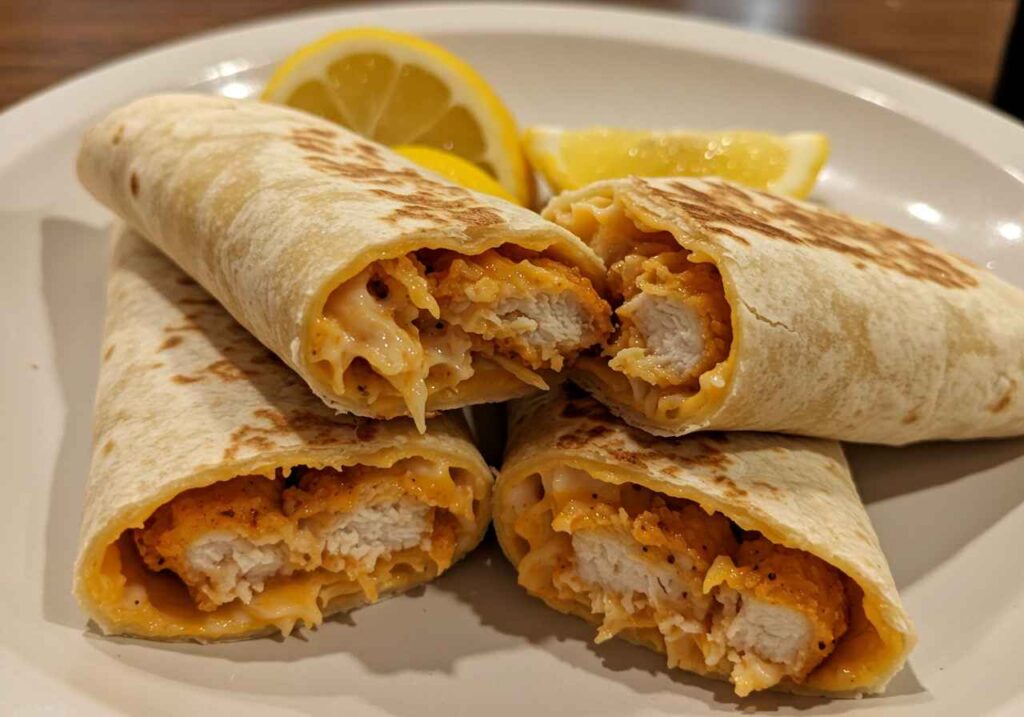
I still remember that hectic Tuesday evening when I made cheesy garlic chicken wraps. The sizzle of golden-brown chicken mixed with melted cheddar and mozzarella was amazing. It was all wrapped in a warm tortilla with garlic butter. That night turned chaotic into something memorable.
These wraps are a mix of creamy textures and bold flavors, ready in under 25 minutes. They’re great for families or meal-prepping for the week. The secret is the tender chicken, sharp cheeses, and that irresistible garlic sauce.
Key Takeaways
- Ready in 25 minutes with 10–14 minutes of active cooking time
- Uses 2 large chicken breasts and 1.5 cups of cheese for optimal flavor balance
- Customize with veggies like bell peppers or swap chicken for thighs
- Pairs perfectly with salads, fries, or fresh herbs like parsley
- Meal-prep friendly: Cook chicken ahead for faster assembly
Why I Love Making Cheesy Garlic Chicken Wraps at Home
Homemade wraps are a perfect mix of indulgence and ease. My favorite chicken cheese wrap recipe is a hit in my kitchen. It’s a great choice for your meals too.
The Perfect Comfort Food Combination
Melty cheese and tender chicken in a warm tortilla is magic. My recipe uses cheddar and mozzarella for that perfect goo. Garlic powder and paprika add depth, and a garlic sauce brings it all together.
With 32g of protein, it’s filling without being heavy. Pro tip: Slow melting cheese makes every bite special.
Budget-Friendly Meal Option
These wraps are affordable, costing about $2.50 per serving. Two chicken breasts make four portions with just flour tortillas and spices. Even adding Parmesan keeps costs low.
They’re cheaper than takeout and let you control what goes in. That’s a big win.
Quick and Easy Dinner Solution
This recipe is quick, ready in 25 minutes. It’s perfect for busy nights. Prep is simple:
- Season chicken with garlic powder, onion powder, and paprika (10 minutes)
- Cook in olive oil until golden (15 minutes)
- Assemble with cheese and sauce in tortillas
Using pre-shredded cheese or rotisserie chicken makes it even quicker. It’s faster than pizza and more satisfying.
These wraps are nutritious and easy to customize. Whether you want cheesy chicken alfredo or a lighter version, the recipe adapts easily. Next, we’ll look at the key ingredients for your perfect wrap.
Essential Ingredients for the Perfect Wrap
Making delicious cheese garlic chicken wraps starts with fresh, top-notch ingredients. Each part is key to getting the right mix of taste and texture. This makes it a favorite for quick dinners.
- Chicken: 2 large breasts (400–500g), diced. Choose organic or free-range for tender meat.
- Cheese: Mix 1 cup sharp cheddar with ½ cup mozzarella for a gooey treat.
- Garlic Sauce: Blend 2 tsp garlic powder, 1 tsp onion powder, and ¼ cup cream cheese for creaminess.
- Tortillas: Use 4 large flour wraps (10-inch) to hold the filling without breaking. Gluten-free options are good too.
Spices like paprika, black pepper, and a pinch of salt add to the savory taste. Cook the seasoned chicken in olive oil for 6–8 minutes for a golden sear. The 2:1 cheese ratio melts well, holding the filling together and adding flavor.
Feel free to add your own touches to the cheese garlic chicken wraps:
- Chopped parsley or cilantro for freshness.
- Jalapeños or chili flakes for a spicy kick.
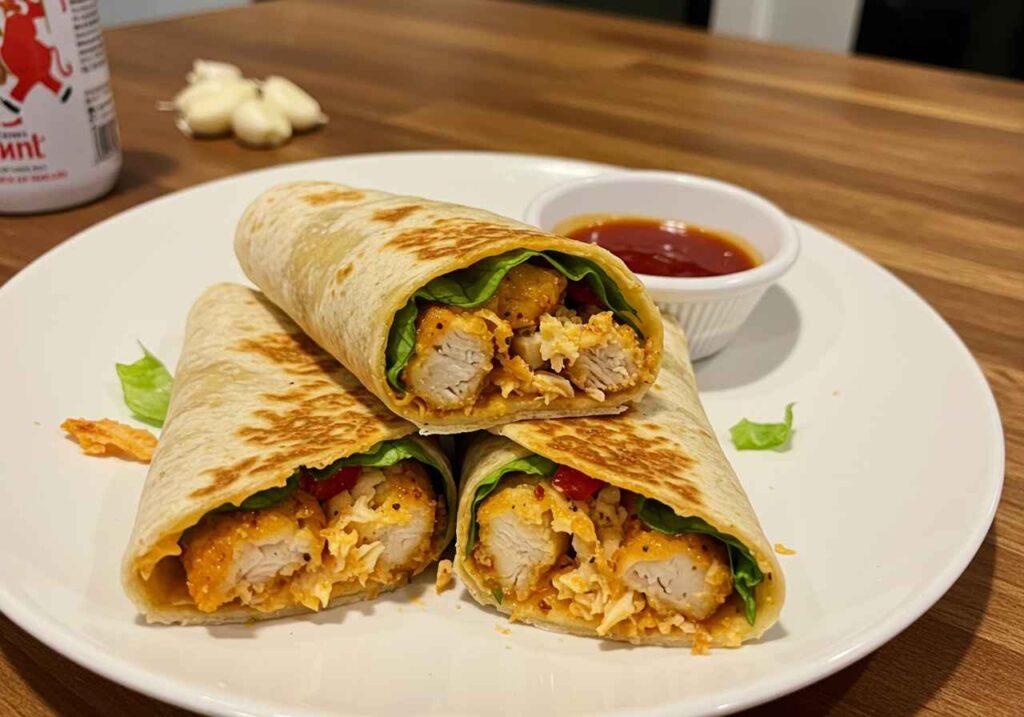
- Sautéed veggies like spinach or bell peppers.
Prepare the filling early and store it in the fridge for up to 2 days. When you’re ready, warm the wraps in a skillet for 2–3 minutes on each side until crispy. With 450 calories per serving, these wraps are great with salads or roasted veggies for a complete meal. They’re perfect for meal prep or feeding a crowd, ensuring everyone leaves happy.
Kitchen Tools and Equipment You’ll Need
Making creamy chicken tortilla wraps needs more than just ingredients. The right tools make cooking easier and taste better. These essentials help with prep and keep flavors consistent, whether for a family dinner or meal prep.
Basic Equipment Requirements
Begin with a 12-inch skillet, like Lodge Cast Iron, for even browning and warming tortillas. A strong spatula and tongs, like OXO’s stainless steel set, are great for flipping meat. A sharp chef’s knife and large cutting board, such as John Boos Maple Edge Grain, are key for slicing and mincing.
Measuring cups and spoons are crucial for the garlic sauce, which holds the filling together. A meat thermometer, like ThermoPro’s digital model, ensures chicken is cooked to 165°F safely.
Optional Tools for Easier Preparation
For crispy tortillas, try a grill pan like Le Creuset’s enameled cast iron. It adds a nice char. A food processor, like Cuisinart’s 7-cup model, makes garlic sauce quickly, perfect for quick meals. Silicone storage bags, such as Stasher, keep chicken fresh for days.
A meat tenderizer, like OXO’s steel mallet, cuts down cooking time. For even cheese melting, use a ceramic-coated nonstick pan, like GreenPan, to prevent sticking.
These tools make making creamy chicken tortilla wraps easier. Start with basic tools and add special ones as you get more comfortable.
Preparing the Cheesy Garlic Chicken Filling
To make the filling for cheesy garlic wraps, focus on three key parts: tender chicken, bold garlic sauce, and melted cheese. Each part adds flavor, making every bite a delight. Let’s explore how to do it.
Marinating the Chicken
I begin with 1.5 pounds of boneless chicken breasts. A marinade of olive oil, garlic powder, onion powder, paprika, salt, and pepper adds flavor. Let it sit for at least 20 minutes to tenderize and season evenly. Cook at 375°F until it reaches 165°F inside. Then, shred or dice it when it cools down.
Creating the Garlic Sauce
The sauce is the glue that holds everything together. Mix 4 minced garlic cloves with mayonnaise, lemon juice, and a bit of salt. Greek yogurt is a lighter alternative. Adjust the garlic to your liking—it should be bold but balanced. This batch makes enough sauce for 4 servings of cheesy garlic chicken wraps.
Cheese Selection and Preparation
Using fresh shredded cheese makes a big difference. I blend cheddar for sharpness and mozzarella for stretchiness. Avoid pre-shredded cheese, as it can affect melting. For a golden look, sprinkle dried oregano or parsley on top before baking.
| Nutrient | Per Serving | % Daily Value* |
|---|---|---|
| Calories | 563 | — |
| Protein | 57.1g | 114% |
| Total Fat | 33.1g | 51% |
| Saturated Fat | 14.7g | 74% |
| Sodium | 881mg | 37% |
Keep leftovers in airtight containers for up to 4 days. Reheat in a 350°F oven covered with foil to keep it moist. These steps will make your cheesy garlic wraps truly special.
Step-by-Step Assembly Guide
Assembling garlic cheesy chicken wraps is easy once you have your filling and tortillas ready. Follow these steps to make wraps that taste like they came from a restaurant in just a few minutes:
- Lay the foundation: Place tortillas flat on a clean surface. Choose whole wheat or low-carb options for a lighter meal.
- Spread the flavor: Use a spoon to coat each tortilla with garlic sauce, leaving a 1-inch border to prevent spillage.
- Layer the filling: Add shredded marinated chicken evenly across the center. Using rotisserie chicken saves time without losing flavor.
- Cheese it up: Sprinkle shredded mozzarella or cheddar over the chicken. Pre-shredded cheese melts faster for quicker assembly.
Fold the tortilla by bringing the bottom edge over the filling, tucking it tightly. Fold in the sides, then roll upward to seal. Press gently to secure the shape.
- Grill wraps seam-side down for 2-3 minutes per side until golden and crisp.
- Bake at 375°F (190°C) for 10-12 minutes if preparing multiple chicken cheese wraps at once.
For best results, serve wraps immediately while the cheese is melty. Pair with fresh veggies or roasted potatoes for a balanced meal. Store extras in airtight containers for up to 3 days—reheat in a skillet to maintain texture.
Customize your garlic cheesy chicken wraps by adding diced tomatoes, spinach, or a drizzle of hot sauce before folding. The method remains the same, ensuring a foolproof meal every time.
My Secret Tips for Extra Flavorful Wraps
Creating perfect creamy chicken wraps is all about three key things. You need bold seasoning, creamy cheese, and tortillas that keep everything in place. These tips turn simple ingredients into amazing cheesy chicken alfredo wraps.
Seasoning Suggestions
Boost your marinade with spices that match the garlic and lemon. I add smoked paprika or Italian herbs for extra flavor. For a zesty touch, mix in 1/4 cup lemon zest before chilling. Pro tip: Let the chicken marinate for at least 30 minutes. This makes the meat tender and flavorful.
- Add 1 tsp cumin for earthy warmth
- Use fresh thyme or rosemary for brightness
- Balance saltiness with a pinch of brown sugar
Cheese Melting Techniques
Combine shredded Kraft cheddar and Sargento mozzarella for the perfect creamy texture. Melt the cheese slowly over low heat, adding a bit of milk to avoid clumps. For a golden finish, broil the wraps at 400°F for 2 minutes.
Tortilla Selection and Preparation
Mission or Old El Paso flour tortillas are the best choice. They’re 10 inches big and hold fillings well. Warm them in a skillet for 15 seconds on each side to make them more flexible. For crispier wraps, brush the outside with olive oil before heating.
- Avoid corn tortillas they crack under heavy fillings
- Store-bought spinach wraps add color contrast
- Dab excess sauce with paper towels to prevent sogginess
Enjoy your creamy chicken wraps with roasted red peppers or parsley for a fresh touch. The 5.2g of fat per serving is balanced, making each bite enjoyable without feeling heavy.
Delicious Variations to Try
Cheese garlic chicken wraps are all about trying new things. They’ve got over 27 million views on social media and a 5-star rating from 78 reviews. This dish is a hit because you can make it your own. Here are some popular ways to spice up your meal.
Cheese lovers can swap standard cheddar for bold alternatives:
- Smoked gouda adds depth to the creamy garlic sauce
- Crumbled feta introduces Mediterranean tang
- Pepper jack brings subtle heat perfect for spicy food fans
Adding veggies can make your wraps healthier without losing flavor. Try sautéed zucchini or roasted red peppers. They go great with the 26g of protein in each serving. For a low-carb option, use butter lettuce leaves instead of tortillas.
Try different proteins with the same cooking method. Shredded rotisserie chicken is quick, and grilled shrimp adds a coastal touch. Many people like adding taco seasoning or sriracha mayo for extra flavor.
With 545mg sodium per serving, balance your wraps with fresh sides. Arugula salads or pickled vegetables are great choices. They add freshness and keep your meal under 262 calories. For easy meal prep, keep ingredients separate and assemble just before eating.
Best Side Dishes to Serve With Your Wraps
Choosing the right sides can make a simple meal into a feast. Whether it’s for a family dinner or a gathering with friends, these options are perfect. They suit different tastes and can be prepared quickly.
Light Side Options
Fresh, crisp dishes balance the richness of cheesy garlic chicken. 60% of wrap lovers prefer fresh veggies like cherry tomato salads or Asian slaw. For a quick fix, try a 10-minute broccoli salad or chilled cucumber lemon water with mint. Quick-prep favorites include:
- Greek salad (15 minutes): Cucumbers, olives, and feta with red wine vinaigrette.
- Air-fried sweet potato fries (ready in 15 minutes, 50% faster than oven baking).
- Zucchini sauté (15 minutes): Garlic, olive oil, and a sprinkle of Parmesan.
Hearty Accompaniments
On colder days or for bigger appetites, roasted or creamy sides warm up the meal. 45% of home cooks enjoy wraps with soups like tomato bisque or Mexican street corn bake (45 minutes, feeds six). Savory options include:
- Parmesan potato wedges (40 minutes): Crispy outside, fluffy inside.
- Collard greens (30 minutes): Simmered with smoked turkey for depth.
- Macaroni and cheese (55 minutes): A kid-approved classic with sharp cheddar.
By balancing textures and flavors, every bite of your creamy chicken tortilla wraps will be a hit. From zesty salads to cozy roasted veggies, these ideas keep meals exciting and satisfying.
Storage and Reheating Instructions
Keeping your cheesy garlic chicken wraps fresh and tasty is key. Whether you’re meal-prepping or saving leftovers, these tips will help. Your wraps will stay delicious.
Proper Storage Methods
Wrap leftovers tightly in aluminum foil or plastic wrap to keep moisture in. Store cheesy garlic chicken wraps in the fridge for up to 3 days. For longer storage, freeze them in airtight containers or heavy-duty freezer bags for up to 3 months. Defrost frozen wraps overnight in the fridge before reheating.
| Method | Duration | Tips |
|---|---|---|
| Refrigeration | 3 days | Use wax paper between wraps to prevent sticking |
| Freezing | 3 months | Label bags with dates for easy tracking |
| Counter | 2 hours max | Keep away from direct sunlight |
Reheating Without Losing Quality
To revive cheesy garlic wraps without drying them out:
- Skillet method: Heat a non-stick pan over medium. Cook wraps 2-3 minutes per side until the tortilla crisps and cheese melts.
- Oven method: Preheat to 350°F. Place wraps on a baking sheet, cover with foil, and bake 10-12 minutes.
- Microwave shortcut: Use 50% power for 1-minute intervals, wrapping in a damp paper towel to avoid soggy tortillas.
For best results, reheat the cheesy garlic chicken filling separately if storing large batches. Pair reheated wraps with fresh veggies or a drizzle of sauce to refresh flavors.
FAQ
What makes cheesy garlic chicken wraps special?
Cheesy garlic chicken wraps are special because they mix tender chicken, melted cheese, and creamy garlic sauce. This makes them a tasty and easy meal to make.
Why is making cheesy garlic chicken wraps at home beneficial?
Making these wraps at home is great. They are a comforting food that’s easy on your wallet. Plus, they’re quick to make, perfect for busy nights.
What are the essential ingredients for the perfect cheesy garlic chicken wrap?
You’ll need diced chicken breasts, olive oil, and spices like garlic powder and paprika. Also, shredded cheddar and mozzarella cheese, large flour tortillas, and creamy garlic sauce are key.
What kitchen tools and equipment are needed to prepare cheesy garlic chicken wraps?
You’ll need a large skillet, a spatula, tongs, and a cutting board. A grill pan and food processor can make prep easier, especially for the garlic sauce.
How do you prepare the filling for cheesy garlic chicken wraps?
First, marinate the chicken in olive oil, garlic powder, and spices. Then, blend mayonnaise, garlic, lemon juice, and salt for the garlic sauce. Finally, shred the cheese.
How do you assemble the cheesy garlic chicken wraps?
Lay out tortillas and spread garlic sauce on each. Add chicken and cheese, then fold the tortillas to seal the filling inside.
What are some secret tips for making the cheesy garlic chicken wraps even more flavorful?
Add smoked paprika or herbs to the chicken for extra flavor. Use a mix of cheddar and mozzarella cheese for creaminess. Warm the tortillas before filling for better pliability.
What are some delicious variations of cheesy garlic chicken wraps to try?
Try different cheeses like pepper jack for spice or Monterey Jack for mildness. Adding diced bell peppers or onions can also boost flavor and nutrition.
What are the best side dishes to serve with cheesy garlic chicken wraps?
For a light side, a fresh salad with greens and cherry tomatoes is good. For something heartier, crispy fries or creamy tomato soup pair well with the wraps.
How can you properly store and reheat cheesy garlic chicken wraps?
Wrap the wraps tightly in plastic or foil and refrigerate for up to 3 days. To reheat, use a skillet over medium heat until the cheese melts and the tortilla crisps. Microwaving is also an option, but be careful not to overheat.
Conclusion: Mastering Your Cheesy Garlic Chicken Wrap Game
Getting good at making garlic cheesy chicken wraps takes time. But the effort is worth it. This meal is ready in just 25 minutes, packed with 30 grams of protein and 350 calories.
Use precise cooking methods like reaching 165°F for chicken. Also, add ¼ cup shredded cheese per wrap for the right taste. This ensures a balanced flavor in every bite.
Try new flavors like Mediterranean or buffalo-style. The original recipe has been shared 17.6K times on Facebook. It’s a hit with many.
Prepare your fillings two days early to make quick wraps during busy times. Leftovers stay fresh in airtight containers for up to five days. They keep their texture perfectly.
Choose fresh cheeses like sharp cheddar or creamy mozzarella to make your wraps better. Heat a skillet to 350°F to crisp tortillas quickly. This keeps your fillings warm and delicious.
Share your creations online. 14 social media shares show how much people enjoy these wraps. They’re a favorite among many.
Whether you’re meal prepping or hosting friends, this recipe works great. Keep track of internal temperatures and adjust seasonings as needed. Explore different flavors from around the world. Your cooking skills will impress everyone with these tasty, garlicky, cheesy wraps.